| Back to Back Issues Page |
 |
|
The Goldfish Gazette, Issue #025 -- The Ideal Fry Setup January 31, 2016 |
Goldfish Care Tips and GuidelinesA Free Monthly Resource For Goldfish Enthusiasts In This Issue
To successfully raise Goldfish fry, they need to be raised in clean fresh water and fed as much food as they can eat. Ideally, the fry will have unlimited room to grow in. The Ideal Fry Setup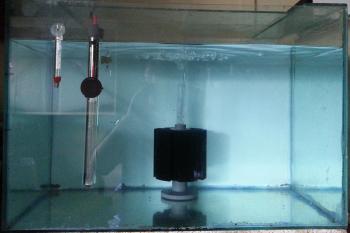
I often get emails about a successful spawning, but after a short period of time the fry start dying off in large numbers. Most of the important facts required to raise fry successfully are covered on the website page Raising Goldfish Fry but I thought I would go into more detail about the fry set up that I have found successful. Fry Aquarium SetupI use 18 US gallon (68 liter) aquariums. This size is big enough to hold 10-12 spawning mops and the plastic sheeting I put under the spawning mops to catch eggs that fall to the bottom. It is small enough for me to pick up with an inch (25mm) of water in the bottom when I need to remove fry for culling.Each aquarium is devoid of plants, substrate and decorations. It has a heater, thermometer and air diffuser, nothing else. The heater is set at between 70-75oF (21-24oC) as early spring temperatures can suddenly drop, and I want the eggs to start hatching in about 4 days. The thermometer is used to check the temperature as aquarium heaters can be unreliable. The air diffuser is used to circulate the water around the eggs, break up any scum on the surface and keep the water temperature even throughout the aquarium. If I think the spawn size is very large, I will use two air diffusers until the fry start hatching. A glass cover is useful for controlling evaporation and maintaining temperature but isn’t essential. A light above the aquarium is essential when siphoning off debris from the bottom of the aquarium, checking water clarity and food uptake by the fry. I tend to turn it on when the fry start hatching so they know where the surface is.
Transferring A Spawn To The AquariumThe aquarium will be full of clean fresh water that is being aerated by the air diffuser.I don’t have the heater running as the spawning temperature is usually a lot lower than what the heater is set at. I flush the spawning mops and plastic sheeting that I have cut up to manageable sizes in a plastic drum containing aged water before transferring them to the aquarium. I add Methylene Blue to the water at this stage to control fungus and keep bacterial numbers down. After The Fry Become Free SwimmingWhen I notice fry starting to hatch I turn down the aeration so fry swimming to the surface aren’t fighting a strong current. Once the fry have all hatched after two days and some of the fry are free swimming I remove the plastic and spawning mops. I do this as soon as possible because they are full of dead eggs that will pollute the water. Once all the fry are free swimming and feeding, I install a sponge filter that has preferably been aged, or I add some Stress Zyme if it hasn’t to speed up the nitrifying bacteria populating the sponge. The benefits of using a sponge filter is it prevents fry and live food being sucked into it as happens with most other filters. A sponge filter also creates water surface agitation that stops scum forming. For this reason I don’t use a power head on the filters, only air pumps. Fry Aquarium Water MaintenanceEarly water changes are critical for large hatchings.The water should always be clear. At the slightest cloudiness, start doing 50% water changes daily with clean aged water until the filter settles down or you adjust your feeding so all food is gone within a few hours, and little uneaten food needs siphoning off each day. I use siphon hoses I made from 5/8 OD (16mm) aquarium filter hoses with rigid extensions made from filter and acrylic tube. For water changes some aquarists stick a sponge on the end of the tubing to stop fry being sucked up. I use a fine sieve used for baking. I wait for a few days before siphoning off the bottom as the fry tend to be a little slow in responding to being sucked up the siphon tube. I tap the bottom of the aquarium where I want to siphon which usually wakes them up. Fry Food ChoicesOne of the easiest ways to keep fry water clean is to feed Brine Shrimp to your fry.They live for many hours when they are in fresh water, even longer if you have put a handful of salt into the fry water. Fry feed continuously, so what they don’t eat immediately, they will browse on over several hours. Feeding any form of commercially available dry or liquid fry food simply isn’t worth the risk of water pollution. Depending on the spawn size, this setup will enable fry to be raised for one to two weeks before they will need to be culled down or spread out into other aquariums. To read more about how to raise Goldfish fry click here... Comments? Ideas? Feedback? I'd love to hear from you. Just reply to this e-zine and tell me what you think, or what topics you want covered. Next Month's Topic Sponge Filters - are they underrated?www.facebook.com/aboutgoldfish |
| Back to Back Issues Page |